|
|
3/4 View
 Step
1: Step
1:
In this tutorial, I will show you how to
draw the newer version of D from the sequel to the original
"Vampire Hunter D". The new character design is more
interesting, IMO (though I still really like the original),
mainly because the designs stay closer to the original
sketches by Yoshitaka Amano, my favorite artist. ^_^ Anyway,
begin by drawin a circle for the top part of the head. Next,
draw the curved vertical guideline that goes from the top of
the head to the chin, making sure to extend it all the way
down to where his chin would be. Draw diagonal guidelines
tangent to the circles, starting from the bottom of that
vertical guideline you just drew. These will help you draw in
the lower part of the face. His face is rather long and
narrow, so don't make the lower half of the face too small.
Draw the guidelines for the eyes, nose and mouth. Notice how
close together they are; the eyes are very long and thin, and
the nose and mouth are close
together. |
|
 Step 2: Step 2:
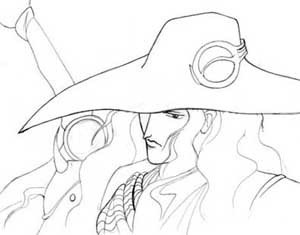
One thing I noticed when drawin this
character is that don't always see both of his eyes because of
the hat. With this particular pose, we can get away with
drawin only one eye, which saves you the trouble of having to
make sure the second one lines up correctly. ^_^ Draw his hat,
which is very long and should cover up his left eye. Notice
that it doesn't sit directly on top of his head; there has to
be room for his hair, which we will draw later on. Draw his
right eye, nose, mouth, ear, and give the left side of his
face more definition so its not just a straight line like we
drew in the previous step. All his features are very long and
thin, which is more apparent in later steps. Make sure you
don't just draw a straight line for his mouth; it should be
slightly curved so you can see his lips (don't define them too
much, though; the curve is very
slight). |
|
 Step
3: Step
3:
Next, start erasing some of the
guidelines. Add detail to his eye, and draw the eyelid. Draw
his shoulders and armor. His hair is very thick and wavy and
should drape over his shoulders and obscure parts of his face.
Really try to make the hair look nice and full, it will make
quite a difference on your final picture. That thing on his
left shoulder is a shoulderpad with a spike; if you could see
both his shoulders, there would be an identical one on the
other shoulder. |
|

Step 4:
Erase all the guidelines, and add detail
to his armor, hat, and clothes. Don't add too much detail to
his hair at this point, unless you don't intend to color your
picture. The contours of the hair will be defined by
highlights in the final step, and if you draw a bunch of lines
in the hair right now, it just makes it a pain to color later
on. ^_^ Draw the hilt of his sword, as well. Erase all
unnecessary guidelines and continue to the final
step. |
|
 Step 5: Step 5:
The coloring on this character is a little
difficult. The base color for his hair, hat, and armor is
almost exactly the same: a very dark black. You want to be
able to tell the difference between each of these forms,
though, so define the hair with highlights of dark brown, and
define the armor with highlights of dark blue. Keep the color
of his skin very pale; the highlights, shadows, and base tones
are all shades of gray. ^_^ |
|
Profile
 Step
1: Step
1:
Next, we will draw the profile. Begin with
a large circle for the top part of the head. Draw the lower
half of the face as best as you can. Just get the shape down
for now; you can add the rest of the details later. To get the
shape of the lower half of the face, draw a very basic outline
of the lower half using straight lines. Then go back and curve
the lines inward where his nose should be (as shown with
lighter red lines). Notice that his face is very long and
narrow like in the 3/4 view. Draw the guidelines for the eyes,
making them very close together (since his eyes are very
narrow). Draw the guideline for his mouth, as well; it should
be located right beneath his
nose. |
|
 Step 2: Step 2:
Next, refine the lower half of the face
even further. His face is more realistic than other anime
characters, so you have to be careful. Make the nose long and
pointed, the lips well defined, and the chin curving out
slightly. Also, draw the outline of the eye and the
ear. |
|
 Step
3: Step
3:
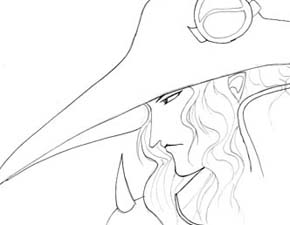
Next, draw his hat, armor, and hair.
Notice that his hat still doesn't sit directly on top of his
head. Draw his hair looking very full and somewhat wavy. Add
detail to his eye, such as the iris, eyelid and eyebrow (which
will be just barely visible under his hat). ^_^ Erase some of
the guidelines. |
|

Step 4:
Next, erase all the guidelines and add the
final details. In this picture, I added details to his hair
before coloring because I wasn't paying attention. I should
not have done that, because it made it much harder to color.
^_^ If you are not going to color it, though, this is sort of
what his hair should look like. Don't forget to draw the
circle thing on his hat before refining your sketch and moving
onto the final step. |
|
 Step 5: Step 5:
Next, color your picture. Again, his hair,
armor, and hat *must* be defined with highlights if you want
them to stand out. His skin should be so pale that you are
only using shades of gray. His face is covered in shadows
because of the hat, so make it darker than usual except for
the highlights along the edges of his face. Also, try to make
the circle on his hat look sort of like a pearl. I'm not sure
if its really a pearl, but on the original pics it sure looks
like one... ^.^ |
|